

We’ve all seen those spooky caterpillar cakes… none of which are ever gluten free, much to the disappointment of us coeliacs.
So, I took a little baking inspiration and made my very own one, bit with a twist… A mummified caterpillar.
Starting with a Gluten Free Chocolate roulade, it’s filled with a very basic vanilla buttercream, then rolled and coated with chocolate buttercream before decorating.
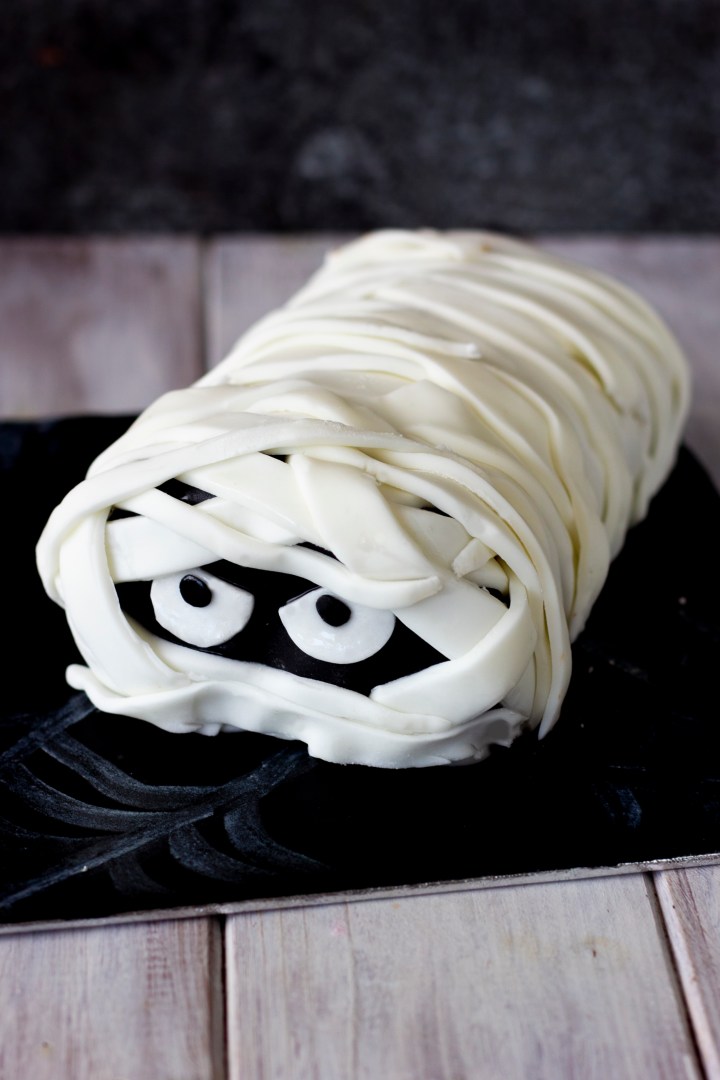

It’s actually quite easy to decorate this to look like a mummy. You just make the face with black roll out icing and make eyes with some white icing too. And then roll and cut out strips of white fondant icing to drape over the roulade.
You will need an electric hand mixer to make the sponge, as you’ll need to beat some eggs until they’re stiff.
Now that’s out the way, here comes the recipe!
Gluten Free Halloween Chocolate Roulade

A spooky twist on the caterpillar cake, made from a light gluten free chocolate roulade filled vanilla buttercream.
Credit: thecoeliacsloth.com
Ingredients
Credit: thecoeliacsloth.com
Ingredients
For the sponge
- 3 Medium free range eggs
- 100g Caster Sugar
- 75g Gluten free flour
- 25g Cocoa powder
- 1tsp Xanthan gum
- 1tsp Vanilla extract
- 15ml Hot water
Buttercream filling
- 60g Unsalted Butter
- 1tsp Vanilla Extract
- 180g Icing sugar
- Milk, to loosen.
Chocolate buttercream coating
- 50g Dark Chocolate (melted and then cooled)
- 100g Butter
- 200g Icing sugar
- 1tsp Vanilla
To decorate
- Black and white fondant icing.
Method
- Preheat oven to 180*c / 200*c fan / Gas Mark 4
- With an electric hand mixer on a fast speed, beat the eggs and caster sugar together in a bowl until the mix stiffens and becomes mousse like.
- Sift the cocoa powder, flour and xanthan gum into a bowl.
- Carefully fold the flour and cocoa powder together, a small amount at a time, until well combined.
- Fold in the vanilla and then mix in the hot water.
- Transfer the batter to a lined rectangular baking tray (13”x9”) and spread evenly.
- Bake for around 9 minutes until spongy. Leave too cool, turn out onto a piece of baking parchment, and trim the edges.
- Make the Buttercream Filling by beating the butter until soft, and then beating in the icing sugar, vanilla extract until smooth and thick. If the buttercream is too stiff, add a little bit of milk to loosen.
- Spread the buttercream filling evenly onto the sponge leaving space at the two short ends.
- To roll the cake, start at the short end and using the parchment, gently ease the end and roll it. Carry on gently rolling, and use the parchment to help get a nice tight roulade.
- Make the Chocolate Buttercream coating by beating the butter, vanilla and dark chocolate together, and then beating in the icing sugar until you have a smooth buttercream.
- Coat the whole roulade with the chocolate buttercream.
- Make the face of the mummy by cutting a circle of black icing to fit the end of the roulade. Stick it on using the buttercream as a glue. Then make some eyes using white icing and stick black icing on to make pupils. You can stick those on to the face using edible glue, writing icing, or some of the remaining buttercream.
- Roll out the white fondant icing, and cut out strips. It doesn’t matter the width or length as this adds to the mummy effect.
- Carefully drape and stick the white fondant strips on, and keep going until you’ve reached your desired mummified cake effect.
- Serve and enjoy!
[/recipe-directions]

So there you have it, if you try these, please let me know in the comments! I’m sure I’ll be back to make more spooky treats soon.
In the meantime, don’t forget to subscribe to my blog and catch me on my social media channels!
Thanks for reading,
Georgina x
